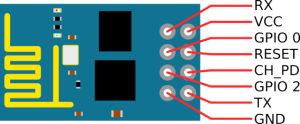
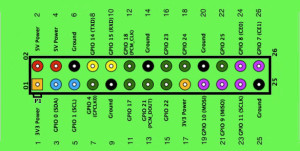
This small tutorial is meant to help you connect the ESP8266 wifi module to Raspberry Pi through the serial port. It will show you how to run a simple AT command and how to connect the chip to your wireless router using these commands.
Before starting the wiring, I highly recommend you to use a breadboard.
You can use the following table as a wiring guide.
Ex: VCC and CH_PD from Wifi module are connected to Pin 1 from Raspberry.
| ESP8266 | Raspberry Pi B |
| VCC and CH_PD | Pin 1 (3V3) |
| GND | Pin 9 (Ground) |
| TX | Pin 10 (GPIO 15) |
| RX | Pin 8 (GPIO 14) |
 |
 |
After you finish the wiring you can plug in the power into Raspberry.
Now weve reached to the phase where we want to access the ESP8266 module through serial port. For this we need a tool called minicom, but first we need to disable Serial Port Login and some Bootup info on Raspberry. You can do that by following the next short steps
Disable serial port login:
Open /etc/inittab and search for the following line:
T0:23:respawn:/sbin/getty -L ttyAMA0 115200 vt100
You need to comment this line by adding # at the beginning of the line.
#T0:23:respawn:/sbin/getty -L ttyAMA0 115200 vt100
Disable bootup info:
This part is optional. At every boot Raspberry will send all bootup information through serial port. If you want to keep that information to be sent, just skip this step.
Remove all ttyAMA0 references from /boot/cmdline.txt
dwc_otg.lpm_enable=0 console=ttyAMA0,115200 kgdboc=ttyAMA0,115200 console=tty1 root=/dev/mmcblk0p2 rootfstype=ext4 elevator=deadline rootwait
After deletion, it should look like the following code:
dwc_otg.lpm_enable=0 console=tty1 root=/dev/mmcblk0p2 rootfstype=ext4 elevator=deadline rootwait
Now we must reboot the Raspberry!
sudo shutdown -r now
The next step is to install minicom and connect to the wifi module. It will help us to communicate with the ESP8266 by offering us an interface where we can run the AT commands.
# Install minicon

sudo apt-get install minicom
# Connect to wifi module

minicom -b 115200 -o -D /dev/ttyAMA0
If everything went well you should see the minicom serial interface. Try to write AT+RST and hit Enter. If it will print some info it means that you are ready to go.
Connect to your home router
AT+CWJAP="dlink","password"
Where dlink is your router name (SSID) and password is the router password.

This was a good article, but the end is misleading.
First AT+RST is not a good command to send because it causes the module to reset and can cause binary data to be sent back, which could look like an error to a newcomer. A much better command to start with is just “AT” or “AT+GMR” which shows version information.
Finally, the part that ended up causing me the most trouble is that you didn’t discuss sending the proper line ending. The ESP2866 expects a carriage return + line feed (CRLF, “\r\n”) after each command. But pressing enter in minicom only inserts the CR. I found this extremely confusing because I would have assumed minicom would send a linefeed (because it is Linux after all). Instead of just pressing Enter (as you say in your article), you actually have to press Enter and then Ctrl+J. Enter sends CR and Ctrl+J sends LF. (Alternatively you could press Ctrl+M, Ctrl+J. If you send the characters using BASH or Python, you would just send “AT\r\n” etc.
Perhaps this depends somewhat on the configuration of the serial port (/dev/ttyAMA0) and the firmware version on the ESP. I have seen someone say that just ending the command with CR is sufficient, but that was not the case for me.